
As many of us already know and feel, making photography with Fujifilm is a powerful, pleasant and liberating experience. I will try to explain the best I can what is this sort of freedom and why is it so. However, I think this story can apply to those photographers who are not professionals, or if they are, then they could consider it while using their Fujifilm camera outside the paid jobs environment (with some exceptions).
For the ones who make the first steps into photography, their start could be by using a smartphone, or a compact camera, even a DSLR, or a mirrorless camera. Those are all tools meant to do one essential task: capture images. They way you do photography can be a bit different, from one type of tool to another, but probably the common way to do it, as a beginner, is by using the Automatic Mode. It is something natural and I truly recommend all beginners to start shooting in Auto Mode. At the beginning of this journey, there are some priorities you have to take into account, like keeping the horizon line horizontal, correctly frame your subjects in view of applying the Rule of the Thirds. Probably later, you will discover the principle of the Guiding Lines and other elements which are essential in migrating from snapshots to photographs. In a previous article, you can find out what is necessary to create good photographs.

The beginning is a challenging time for every endeavour and all the composition aspects mentioned above require a certain level of attention, until they become built-in knowledge, like a reflex. Experimenting with Manual Mode and playing with those settings can be a tricky, or a rewarding experience, like learning from the trial & error approach. However, the day will come when Manual Mode settings will truly enable you to reach that special result, which the camera could never provide, based on its automated algorithms. You need to take control of the settings if you want to reach that desired outcome in your photography.

Full Manual, Aperture Mode, Shutter Speeds let you manually tweak the needed settings: aperture, ISO values, shutter speeds, exposure compensation, focus points, metering types, white balance, bracketing and other elements. Then you find out about RAW and you start to shoot in RAW, embracing its benefits and the higher latitude of post-processing such files.
The amazing thing is that a RAW file comes with 100% of your digital sensor capabilities, retaining a lot more details and information than a JPEG file (which is a compressed form of storing your image information). Let us not go into details on how to process your RAW files and how you can recover “lost” information from the highlights and the shadows of your photo. The Internet is full of tutorials on how to do it. Just remember that a well-developed RAW file will give you (most of the times) a miraculous result, compared to your JPEG straight out of camera file – technically speaking. Having troubles with bad exposure, or wrong white balance? Not to worry, you can fix them while developing your RAW files.

I think this is a natural transition in the personal experience of a photographer: starting by using JPEG files, first, then upgrading to the RAW format workflow. Most of us are obsessed with image quality (although this is not everything that counts for valuable photography). You have a good digital camera, you have invested in some good quality glass and even if there are technical limitations everywhere, you would like to get the best from your system. Why not using your gear at 100% of its capacity? I hear you! And you are right.
However, RAW files require more hard-disk storage and you need to dedicate more time to process them. And time is money, or the freedom you sacrifice. So, do you value your time in your life? Do you spend many hours in front of your screen, post-processing your photos? Isn’t it better to have more time to just go out and photograph, instead of processing your photos, to make them “look better” (especially when most of them are personal memories for personal use)?

Shooting in JPEG with a Fujifilm camera and the customised color profiles means freedom, a simple step of liberating myself, just like when switching from a DSLR system to a mirrorless one.
When I had a DSLR system from Canon, I used to shoot 80% RAW and 20% JPEG. Because the quality of the JPEG files was only good for photos that I will never exhibit anywhere (meaning some street photography, family moments, etc.). Now, owning a Fujifilm camera, for me it is the other way around: 80% JPEG and 20% RAW (when needed). I feel my image quality expectations did not change over the years, but only my gear and the quality output, while using JPEG mode. The JPEG files that Fujifilm cameras can produce are simply stunning. With the perfect settings, there is little to improve in post-processing. Sometimes you can do more harm, than good, while trying to “enhance” a perfect Fujifilm JPEG file.

RAW is the best choice for studio work, or high quality professional well-paid work, where you cannot take your chances – you need to walk on solid ground and provide the best for your clients. But apart from that, I see no reason for shooting in RAW, especially for specific situations (20% of the time, maybe?). There are gifted photographers out there, that are so sure on their skills and camera performance that they easily shoot in JPEG mode and provide excellent quality material. In my case, I needed a great camera that can deliver fabulous JPEG files. Fujifilm just did that for me. They offered me more freedom, more time to just photograph more. The fact of making even 90% of my photography in JPEG makes me smile, while looking to my past tense in photography.

Most of the times, I shoot in Aperture Mode. Sometimes I change ISO values, sometimes I set a certain shutter speed, according to the needs of the situation, but a lot of my photos are made while controlling only the aperture. The camera does the rest – and it does it wonderfully, most of the times. I am not ashamed to say that Manual Mode (although I know how to use it) is not my main shooting mode for my cameras (except film cameras, which I love and still use – fully Manual Mode, there is no other way). Yes, I shoot in Aperture Mode and by doing that, I miserably fail to impress others with my “professionalism” J
When Fujifilm launched the X-Pro3, I think they had this kind of principles in mind: to shoot more, in a more enjoyable manner, while focusing on the composition, on what is really important. With the additional film simulations to the already existing list, and the capability of focusing up to -6 EV (-5 EV for the new X100V), you have even more freedom of action, making the need of shooting in RAW even less justified. Again, let us make things clear: if you are a professional and you deliver paid photographs to your clients, while the best of the best is required from your work, then you may disregard my commendation to shoot in JPEG.

But as a passionate amateur, without constrains, the question is: When will you free yourself of the burden of technical aspects in your photography, out there in the field, or streets? Only then you will have the mental resources to connect yourself to your feelings, the source of inspiration, see the scene in a different “light” – the things that really matters in photography. Isn’t it great to be free?
All the images I have used in this article were made with a Fujifilm camera, in JPEG mode. Please take my word that they are exactly as I wanted them to be. I had no need to record them also in RAW. They are not perfect, technically speaking, but who needs that kind of perfection in art? You may not like them, or you could say “I would use different settings”. This is not the point. The most important matter in the photographic work that I make is that firstly, it should please my spirit.
Talking about good looking JPEG files made with Fujifilm camera, there are a few aspects to learn about.
For shooting in JPEG mode, you need to customize your Color Profiles. I use the X-H1 and I have 7 Color Profiles that I can customize to my needs, as I enjoy photographing a lot more that post-processing and I would immediately trade the time we spend in front of the PC with Photoshop on, for some more time and chances to actually photograph. This is why I enjoy so much shooting in JPEG, hence the need to make the images look as good as possible at SOOC (straight out of camera) level, without the demand to alter them, afterwards (or at least not so much).

When I go into the Menu, I select “I.Q.” which stands for Image Quality Settings and on that page, I have “Select Custom Setting” and “Edit/Save Custom Setting”. When I choose to edit and save the custom settings, I have 7 color profiles. I will write them down for you, and then I will explain the reasons for my choices:
- DR Auto; Film simulation: ASTIA; Grain OFF; White Balance Auto; Highlights -2; Shadows -2; Color +1 Sharpness 0; NR -2.
- CINESTILL 800T. DR 200; Film simulation: PRO Neg Standard; Grain Weak; White Balance 3200K; Highlights +3; Shadows +1; Color -1; Sharpness +1; NR -3.
- DR Auto; Film simulation: ETERNA; Grain OFF; White Balance Auto; Highlights -2; Shadows -1; Color +1; Sharpness 0; NR 0.
- DR Auto; Film simulation: CLASSIC CHROME; Grain OFF; White Balance Auto; Highlights -2; Shadows -2; Color +2; Sharpness +1; NR -1.
- PORTRA 400. DR 400%; Film simulation: CLASSIC CHROME; Grain Weak; White Balance 5600K; Highlights -2; Shadows -2; Color -1; Sharpness -1; NR -3. Note that the White Balance is set at 5600K with a shift of Red +2 and Blue -5.
- BW PORTRAIT. DR 100%; Film simulation: ACROS + G Filter; Grain OFF; White Balance Auto; Highlights -2; Shadows -2; Sharpness -1; NR -1.
- BW RED POWER. DR Auto; Film simulation: MONOCHROME + R Filter; Grain OFF; White Balance Auto; Highlights -2; Shadows 0; Sharpness +1; NR 0.
How do I use those color profiles, according to my taste, moods and needs? First, a photo example and below, the description:

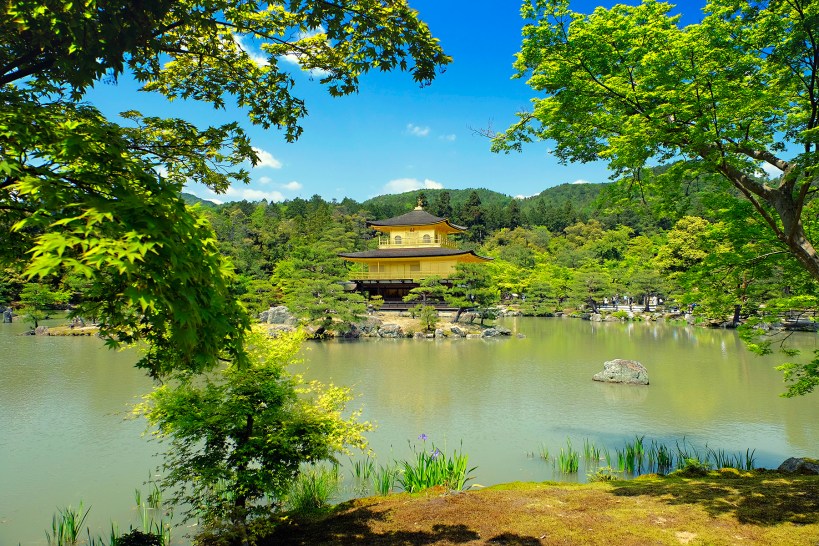
Fuji X-H1 . Fuji XF50-140mmF2.8 @115mm . f/5.6 . 1/1000″ . ISO 200
Standard: This is the standard color profile that I use for general purposes, where no special effects are needed. ASTIA simulation offers softer colors and discrete contrast. Normally, I set this profile when finishing using my camera, so it can be ready for any urgent situation, when I quickly turn on my Fujifilm camera and get a shot that looks “normal” and good (except the cases when I forget).
Fuji X-H1 . Fuji XF50-140mmF2.8 @115mm . f/5.6 . 1/2200″ . ISO 400
CineStill 800T: This is the one which supposedly imitates the characteristics of the CineStill 800T ISO800 film. With visible grain, high contrast and less dynamic range, having a shift towards blue, it is simply a cool film simulation for high ISO, low light situations with artificial lights within your frame.

Fuji X-H1 . Fuji XF50-140mmF2.8 @115mm . f/5.6 . 1/1050″ . ISO 200
ETERNA: This is one of my favorite film simulations, so appreciated in videography, but also very interesting in photography, as well. Before using X-H1 (which comes with ETERNA included), I had the X-Pro2. Because I like ETERNA simulation, I thought about a way to imitate it, by using PRO NEG STANDARD film simulation which offers soft colors, ideal for portraits and then subtract some color and put everything on Minus, for a more discreet look, with less contrast. I think, by manipulating the White Balance and setting a more warm tone, we might be getting close to what ETERNA really looks like; useful for Fujifilm cameras which do not have ETERNA.
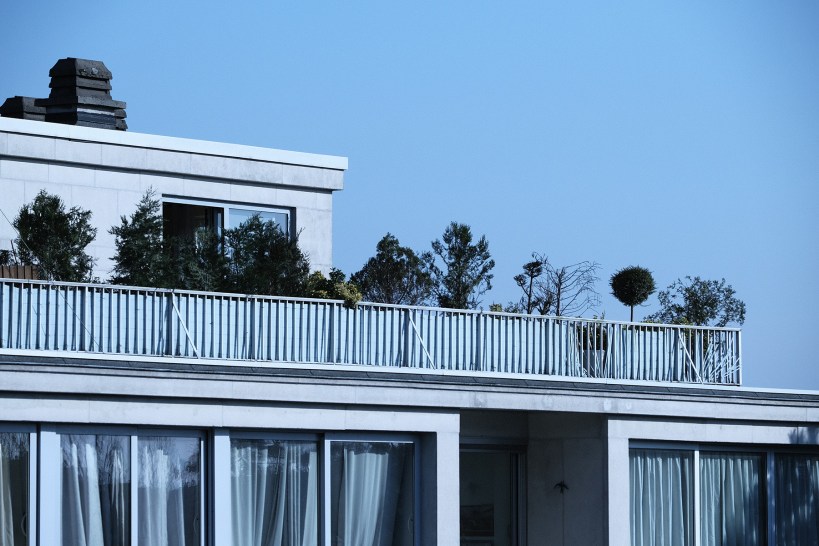
Fuji X-H1 . Fuji XF50-140mmF2.8 @115mm . f/5.6 . 1/1000″ . ISO 200
CLASSIC CHROME: This is a wonderful film simulation, but in my version, I need it to offer more color and contrast; this is why my choices are Color +2 and Sharpness +1.

Fuji X-H1 . Fuji XF50-140mmF2.8 @115mm . f/5.6 . 1/4200″ . ISO 800
KODAK PORTRA 400: This profile simulates (surely not entirely accurate, but quite close) one of the most loved and used film which Kodak still manufactures (Thank God!). With its warm tones and true to life gentle skin tones, it is the perfect choice for portrait photographers using analog cameras, but this film is so good and versatile, it can be used in almost any conditions and for any type of photography.

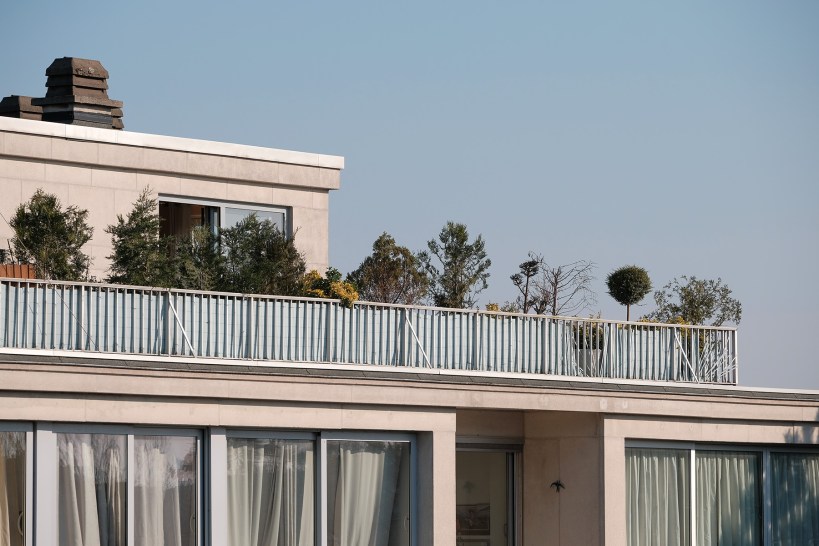
Fuji X-H1 . Fuji XF50-140mmF2.8 @115mm . f/5.6 . 1/1050″ . ISO 200
BW Portrait: ACROS is a wonderful film simulation, but in my version, I tuned this profile for a higher dynamic range, with very soft contrast and sweet grey tones – ideal for subdued portraiture.
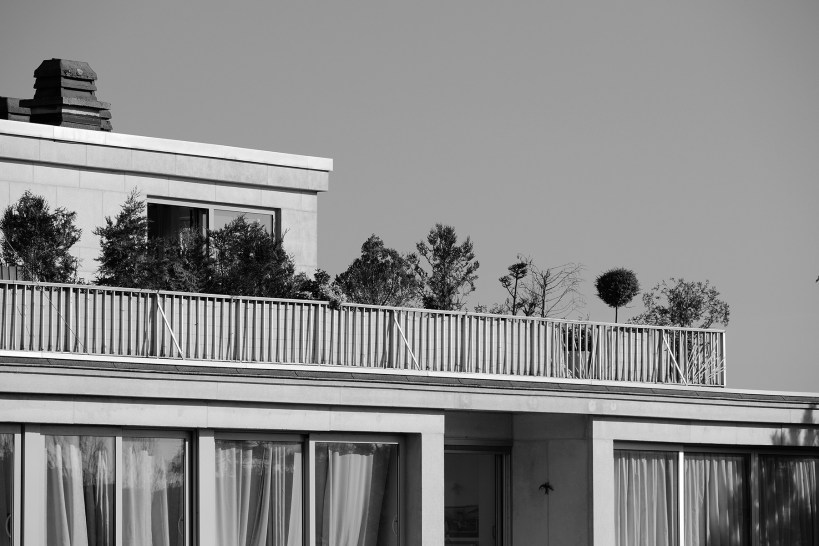
Fuji X-H1 . Fuji XF50-140mmF2.8 @115mm . f/5.6 . 1/1050″ . ISO 200
BW Red Power: Again, a black and white profile using MONOCHROME with the Red Filter on, where the Shadows setting at +2 offers a more powerful and rich in contrast look. Usually, I try to set the Exposure Compensation to a positive value, just to get more brightness and compensate a bit the powerful contrast.
As you can see, I don’t use much Grain (only in special cases, where a color profile tries to mimic the characteristics of a film type) and the general bias is to have Sharpness and Noise Reduction on negative levels. Also, very important: the Highlights and the Shadows are almost always on negative levels; together with Dynamic Range set on Auto (where DR can easily go to 400%) it helps me getting the maximum dynamic range this camera can do, while shooting in JPEG. You can easily add contrast, later, but if you choose VELVIA simulation with all other settings on 0, or positive values, you will certainly gain a lot of punchy contrast and vivid colors, but you will surely lose dynamic range and some details in the shadow areas. It is better to have the possibility to add contrast, saturation, vibrancy later; changing the color curves in simple, fast steps is often better than loosing dynamic range.

The best thing you can do is to experiment with different settings, make some tests and see what your ideal color profile might look like, in order to achieve the images that represent your style in photography. I only wished for more film simulations (like Classic Neg in X100V, for example) and the ability to save custom white balance settings, attached to a color profile (X-Pro3 and X100V, for example) and maybe 10, 12 color profiles, instead of 7.

One thing becomes clearer to me, while looking into my style of shooting in the past, the archived photos and the way I used to process my files: with a careful customisation of the available color profiles, I can get, in most cases, the images with the look that I want and forget about heavy post-processing my files; not to mention that JPEG files from Fujifilm have quite a wide latitude of processing (at least compared to my Canon DSLR where I needed to rely on RAW files almost all the time).

Fujifilm JPEG files are amazing! You only need to experiment and discover this liberating joy!
I think it is a great motivation to do photography – to please your spirit – to translate emotions and moments into images. The value of that unique feeling, during that unique moment can be forever “written” in a photograph. I believe that the composition and the story behind the “decisive moment” is what give true value to a photograph, not necessarily the recovered information from the highlights and the shadows and the clinical sharpness of a lens. Nowadays, there is this technical tendency of manufacturing super sharp lenses, with less, or almost non-existent “character”, only to realise that the images are too sharp (especially in portrait work), that we need to soften the image in post-process. This is how I have realised might path in photography might take me back to film photography. More on this, hopefully in a future article. Until then, May the Light be with you and be ready to seize the unrepeatable moments!
Exclusive content, previously published in April 2020 on FUJI X PASSION – Inspirational Photography Magazine (Premium Area) – www.fujixpassion.com
All photos and text – © Sebastian Boatca 2020 / www.sebastianboatca.com